SDK for iOS
SDK for iOS is a software development kit for fast integration of the PSPHost payment solutions right in your mobile app for iOS. With SDK for iOS, you can quickly build and offer you customers a fast checkout experience from inside of your iOS app. In this section you will find information about using SDK for iOS as well as Swift and Objective-C code samples.
Within SDK for iOS 1.9 two versions are available: SDK for iOS 1.9.1 can be embedded in mobile applications running on iOS 11 or above and compatible with XCode 11 or above, while for mobile applications running on iOS 10 and compatible with Xcode 10 SDK for iOS 1.9.0 should be used.
- Libraries: https://github.com/psphost/iOS-SDK/releases
- Sample code: https://github.com/psphost/iOS-SDK
General information about SDK for iOS
What can I do with SDK for iOS?
SDK for iOS allows you to perform purchases by using payment cards and alternative payment methods. You may perform one-step and two-step purchases and COF purchases using payment cards, as well as card verification (more).
SDK for iOS also supports payment processing by using methods listed in the Payment methods section. For information about setup and configuration, contact your PSPHost Key Account Manager.
- Support for English and Russian. Default language is English; the payment form uses Russian only when Russian is selected as the user interface language in the mobile device settings. For the merchant it is also possible to select the language of the payment form.
- Customization of payment form (more).
- Support for different ways to enter card data (more):
- manual input
- card scan
- saved card selection
- preselected card usage
- Gathering or passing additional customer data for further analysis (more).
- Clarification of additional parameters required for payment (more).
- Support for 3‑D Secure 2 authentication. 3‑D Secure 2 is a new version of 3‑D Secure (Three-Domain Secure) protocol, which is intended to secure e-commerce card payments. (For more information about 3‑D Secure, see Authentication by using 3‑D Secure 2.)
- Support for additional attempts to perform payments (more).
- Getting information about the payment. On all pages of the payment form there is an information button; when tapped, this button shows information about the ID, the amount, the date of the payment and payment description.
- Sending receipts to the customer (more).
What's inside?
SDK for iOS contains the library which is used for developing applications and running them on Apple devices, and code samples in Swift and Objective-C.
Payment workflow
- Your client app creates an instance of payment object with all the necessary checkout details.
- On the basis of the payment object parameters, the back end part of you app generates the signature for checkout request.
- You call a special method of the payment object to have the client app initiate a checkout request and send it to the PSPHost payment platform.
- The PSPHost payment platform processes the checkout request and performs the payment.
- The payment platform sends the payment processing results to the client app.
- The payment platform sends a callback with the payment processing results to the callback URL you specified.

Using SDK for iOS
- Make sure you have you have ready your merchant ID and secret key obtained from PSPHost.
- If your company has never obtained any ID or secret key from PSPHost, you need to submit an application for connecting to the PSPHost payment platform.
- If your company already has an ID and a secret key to sign messages obtained from PSPHost, you need to notify PSPHost customer support that you want to use SDK for iOS and consult with the customer support on how to arrange a test run.
- Integrate the PSPHost payment solution in your app:
- Implement the checkout request signing functionality on the back end side of your mobile app.
- Download the SDK for iOS library.
- Import the SDK for iOS library into your client app and implement the following functionality: collection of payment details, preparation of data for signing checkout request, opening payment form, and submitting request to the payment platform for payment results.
- Test and put in production mode.
- Request test card numbers and test merchant ID from PSPHost and debug and test your app.
- Once testing is complete, request your production merchant ID from PSPHost and put your app in production mode.
With any questions regarding usage of SDK for iOS contact PSPHost technical support service.
Payment form interface


Signature generation
To verify data integrity and authenticate the messages your application exchange with the PSPHost payment platform, all the messages need to be signed. You must sign all your outgoing messages (for example, checkout request) and check signatures of all the incoming messages (for example, callbacks). Before generating signature, you need to prepare the payment data by packing all the payment parameters into a single string. The string is generated on the client side where you can use SDK for iOS for this purpose. The signing process requires the secret key provided by PSPHost therefore the signing procedure must be performed on the back end side of your app.

- Generate the HMAC value based on the SHA-512 hashing algorithm and your secret key.
- Encode the result of step1 using Base64.
- Input data
- Sample string to sign:
customer_id:5;payment_amount:30;payment_currency:RUB;payment_id:payment1;project_id:115 - Sample secret key:
12345
- Sample string to sign:
-
Result: generated signature:
pVmAtGFBQJD2NgLToP1B2elR4QROiYGi3IobPD9PFDfrkjBqdSCFgrVSEtebVJUzOUUHX5tPnHQq9RMn61679A==
The signature your back end generates based on the sample string and the secret key must be exactly the same as of the sample generated signature.
We recommend choose specific implementation of the signing algorithm based on the programming environment you use. For the detailed information about signature generation, see Signature generation and verification.
Adding library in your project
Importing libraries in Swift
- Copy the
psphostSDK.xcframeworkfile in the project folder of you iOS app. - Add the library into your project. When using Xcode 12, you need to do the following:
- Open the target of your project.
- Select .
- Click +.
- Click Add Other.
- Select the
psphostSDK.xcframeworkfile and click Add.
- Add key NSCameraUsageDescription with value
permission is needed in order to scan cardto the Info.plist file. - If your iOS app does not use user location information, add the NSLocationWhenInUseUsageDescription key with the
fraud preventionvalue in the Info.plist file.The PSPHost libraries code does not request user location, if the request is not initiated by the host app, but App Store requires that the NSLocationWhenInUseUsageDescription key value is not empty.
If your iOS app requests user location information, you can skip this step.
- If the iOS app does not have permission to save data on the mobile device, add Privacy - Photo Library Usage Description and Privacy - Photo Library Additions Usage Description keys with values to the Info.plist file. The values specified are shown to the customer in the permission request message.
Importing libraries in Objective-C
Listed below are the instructions on how to import a PSPHost library into your iOS app.
- Copy the
psphostSDK.xcframeworkfile in the project folder of you iOS app. - Add the library into your project. When using Xcode 12, you need to do the following:
- Open the target of your project.
- Select .
- Click +.
- Click Add Other.
- Select the
psphostSDK.xcframeworkfile and click Add. - Select Build Settings.
- Set Always embed swift embedded libraries to Yes.
- Add key NSCameraUsageDescription with value
permission is needed in order to scan cardto the Info.plist file. - If your iOS app does not use user location information, add the NSLocationWhenInUseUsageDescription key with the
fraud preventionvalue in the Info.plist file.The PSPHost libraries code does not request user location, if the request is not initiated by the host app, but App Store requires that the NSLocationWhenInUseUsageDescription key value is not empty.
If your iOS app requests user location information, you can skip this step.
- If the iOS app does not have permission to save data on the mobile device, add Privacy - Photo Library Usage Description and Privacy - Photo Library Additions Usage Description keys with values to the Info.plist file. The values specified are shown to the customer in the permission request message.
Opening payment form
This section contains samples of payment form invocation code in Swift and Objective-C.
Opening payment form in Swift
To open payment form, do the following:
- Import the library:
import psphostSDK - Declare the
psphostSDKlibrary in you app (for example, inside theviewDidLoadmethod):let psphostSDK = PsphostSDK()
- Create an object named
PaymentInfowith all the required parameters and any number of optional parameters, for example (required parameters are highlighted with bold optional parameters highlighted with italic):let paymentInfo = PaymentInfo(projectID: 10, paymentID: "internal_payment_id_1", paymentAmount: 1999, paymentCurrency: "USD", paymentDescription: "T-shirt with dog print", customerID: "10", regionCode: "US")
Here are the required parameters:
- projectID—project (merchant) ID PSPHost assigned you
- paymentID—payment ID, must be unique within the project
- paymentAmount—payment amount in minor currency units
- paymentCurrency—payment currency code according to ISO-4217 alpha-3
Here are the optional parameters:
- recurrentInfo—object with the details of COF purchase (more)
- paymentDescription—payment description (this parameter is available not only to the merchant, but also to the customer; if paymentDescription is specified in the request, it is visible to the customer in the payment form (in the dialog box containing information about the payment); if this parameter is not specified in the request, it is not visible to the customer)
- customerID—customer ID
- regionCode—customer country
- token—card token
- action—action type (
Sale(by default),Auth,Tokenize, orVerify) - forcePaymentMethod—the identifier of the payment method to opened on the payment form. If this parameter is specified, the payment method selection page is skipped. For the list of the payment method codes, see IDs of payment methods supported by Payment Page.
- hideSavedWallets—hiding or displaying saved payment instruments in the payment form. Possible values:
true—saved payment instruments are hidden, they are not displayed in the payment formfalse—saved payment instruments are displayed in the payment form
PsphostScreenDisplayMode—object to manage display of the final page of the payment form and hide the final page if necessary. The following parameters can be passed in the object:hide_success_final_page—the final page with the message about the performed payment is not displayed in the payment form.hide_decline_final_page—the final page with the message about the declined payment is not displayed in the payment form.
The following is an example of specifying the
hide_success_final_pageandhide_decline_final_pageparameters in the request:// Init PaymentInfo paymentInfo.addScreenDisplayMode(value: "hide_success_final_page") .addScreenDisplayMode(value: "hide_decline_final_page")
- Pack all the payment parameters into a string for signing:
paymentInfo.getParamsForSignature();
- Send the string to your back end.
- Have your back end generate the signature on the basis of the string and your secret key.
- Add signature in your
PaymentInfoobject:paymentInfo.setSignature(value: signature)
- Open the payment form by using the following code:
psphostSDK.presentPayment(at: self, paymentInfo: paymentInfo) { (result) in
   print("psphostSDK finished with status \(result.status.rawValue)")
   if let error = result.error {                     // if error occurred
      print("Error: \(error.localizedDescription)")
   }
   if let token = result.token {                    // if tokenize action
      print("Token: \(token)")
   }
 }
Before opening the payment form, the library check for any errors and opens the payment form only if no errors occur. Otherwise, the payment form is not opened and the presentPayment method returns the error code.
Opening payment form in Objective-C
To open payment form, do the following:
- Import the library:
#import <psphostSDK/PsphostSDK.h> - Declare the psphostSDK library in you app (for example, inside the
viewDidLoadmethod).psphostSDK *psphostSDK = [[psphostSDK.h alloc] init];
- Create an object named
PaymentInfowith all the required parameters and any number of optional parameters, for example (required parameters are highlighted with bold optional parameters highlighted with italic):PaymentInfo *paymentInfo = [[PaymentInfo alloc] initWithProjectID:10 paymentID:@"internal_payment_id_1" paymentAmount:1999 paymentCurrency:@"USD" paymentDescription:@"T-shirt with dog print" customerID:@"10" regionCode:@"US"];
Here are the required parameters:
- projectID—project (merchant) ID PSPHost assigned you
- paymentID—payment ID, must be unique within the project
- paymentAmount—payment amount in minor currency units
- paymentCurrency—payment currency code according to ISO-4217 alpha-3
Here are the optional parameters:
- recurrentInfo—object with the details of COF purchase (more)
- paymentDescription—payment description (this parameter is available not only to the merchant, but also to the customer; if paymentDescription is specified in the request, it is visible to the customer in the payment form (in the dialog box containing information about the payment); if this parameter is not specified in the request, it is not visible to the customer)
- customerID—customer ID
- regionCode—customer country
- ActionType—action type (
Sale(by default),Auth,Tokenize, orVerify) - token—card token
- forcePaymentMethod—the identifier of the payment method to opened on the payment form. If this parameter is specified, the payment method selection page is skipped. For the list of the payment method codes, see IDs of payment methods supported by Payment Page.
- hideSavedWallets—hiding or displaying saved payment instruments in the payment form. Possible values:
true—saved payment instruments are hidden, they are not displayed in the payment form.false—saved payment instruments are displayed in the payment form.
PsphostScreenDisplayMode—object to manage display of the final page of the payment form and hide the final page if necessary. The following parameters can be passed in the object:hide_success_final_page—the final page with the message about the performed payment is not displayed in the payment form.hide_decline_final_page—the final page with the message about the declined payment is not displayed in the payment form.
The following is an example of specifying the
hide_success_final_pageandhide_decline_final_pageparameters in the request:// Init PaymentInfo [paymentInfo addScreenDisplayMode: hide_success_final_page]; [paymentInfo addScreenDisplayMode: hide_decline_final_page];
- Pack all the payment parameters into a string for signing:
paymentInfo.getParamsForSignature();
- Send the string to your back end.
- Have your back end generate the signature on the basis of the string and your secret key.
- Add signature in your
PaymentInfoobject:[paymentInfo setSignature:signature];
- Open the payment form by using the following code:
[self.psphostSDK presentPaymentAt:self paymentInfo:paymentInfo
     completionHandler:^(psphostPaymentResult *result) {
     NSLog(@"psphostSDK finished with status %ld", (long)result.status);
     if(result.error != NULL) {                                  // if error occurred
         NSLog(@"Error: %@", result.error.localizedDescription);
     }
     if(result.token != NULL) {                               // if tokenize action
         NSLog(@"Token: %@", result.token);
     }
 }];
Before opening the payment form, the library check for any errors and opens the payment form only if no errors occur. Otherwise, the payment form is not opened and the presentPayment method returns the error code.
Response processing
To receive and process response with the payment processing results you need to add the following code:
psphostSDK.presentPayment(at: self, paymentInfo: paymentInfo) { (result) in
   print("psphostSDK finished with status \(result.status.rawValue)")
   if let error = result.error {               // if error encountered
      print("Error: \(error.localizedDescription)")
   }
   if let token = result.token {               // if tokenize action performed
      print("Token: \(token)")
   }
 }
[self.psphostSDK presentPaymentAt:self paymentInfo:paymentInfo
     completionHandler:^(psphostPaymentResult *result) {
     NSLog(@"psphostSDK finished with status %ld", (long)result.status);
                if(result.error != NULL) {         // if error encountered
         NSLog(@"Error: %@", result.error.localizedDescription);
     }
     if(result.token != NULL) {                    // if tokenize action performed
         NSLog(@"Token: %@", result.token);
     }
 }];
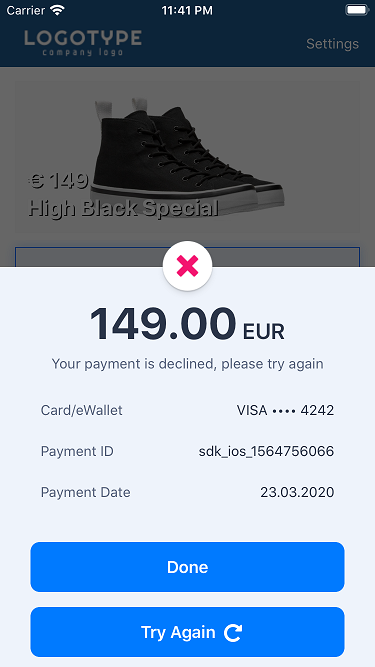
The result code is returned in the paymentStatus parameter.
The following table lists possible response codes returned in the paymentStatus parameter.
| Value in paymentStatus | Description |
|---|---|
| 0 | Checkout successfully completed. |
| 100 | Operation was declined, for example because of insufficient funds. |
| 301 | Operation was cancelled by the customer. |
| 501 | An internal error occurred. You may need to contact technical support. |
Callbacks
Overview
When using SDK for iOS, the merchant can receive callbacks that are sent by the payment platform directly to merchant web service and callbacks that are first sent by the payment platform to SDK for iOS and then by SDK for iOS to merchant mobile application. In the former case, the parameters sent in callbacks may vary depending on the configurations (more). In the latter case, specific set of parameters is provided—the data about status, type and ID of the payment, currency and amount of the payment as well as the payment method that was used:
{
    "payment": {
        "status": "success",
        "type": "purchase",
        "id": "12345",
        "date": "2020-09-11T14:49:18+0000",
        "method": "card",
        "sum": 1000,
        "currency": "USD"
         }
}
The following sections provide information about these callback messages.
Callbacks sent by the payment platform
The payment platform sends all the callback messages to the callback URL you specify. You need to contact the PSPHost technical support and provide the URL to send callbacks. For more information about callbacks, see Callbacks in Payment Page.
Callbacks sent by SDK for iOS
Merchant mobile application can receive callback messages with information about purchase processing result from SDK for iOS as information about payment processing result is sent to SDK for iOS by the payment platform. The callback message is sent to the merchant before the page with information about the result is displayed to the customer on the payment form.
To obtain information about payment result, you need to use the PsphostCallback public protocol. This protocol involves the use of the onPaymentResult method which comes into action automatically as the final payment status is received and, as a result, the merchant receives information about the payment result. To obtain information about the purchase processing result, you can use the following examples of the code with no additional setup; if needed, you can also change the code.
class YourClass: PsphostCallback {
    func presentPaymentPage() {
        psphostSDK = PsphostSDK(callback: self)
        ...
    }

    func onPaymentResult(paymentData: PsphostPaymentData) {
        // callback
    }
}@interface YourClass() <PsphostCallback> { PsphostSDK *psphostSDK; }
@implementation YourClass
...
- (void)presentPaymentPage {
self.psphostSDK = [[PsphostSDK alloc] callback: self];
...
}
- (void)onPaymentResult:(PsphostPaymentData *)paymentData {
// callback
}Managing card data
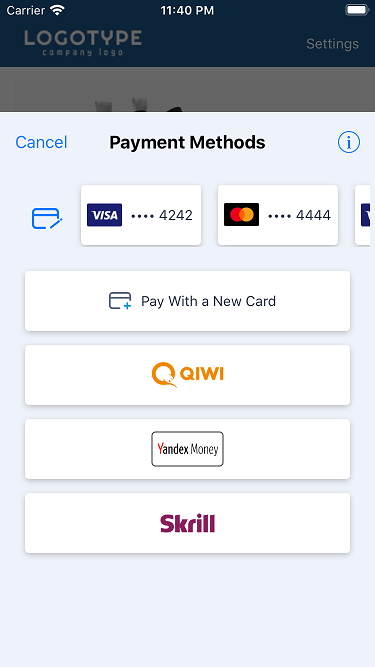
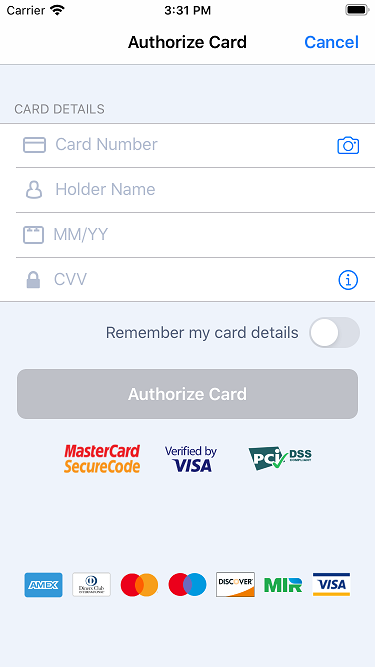
When paying with a payment card, the customer needs to enter the card data on the payment form. In addition to the traditional data entry method (manually), SDK for iOS allows you to scan a card, use a saved card or a card token for payment.
Checkout by using stored checkout credentials
You can offer your customers an option to save credentials of cards used for checkout. Your customers will be able to save one or more cards and reuse them for any further purchases without specifying the card details—the customer will be only asked to enter CVV for the current card.
To allow customer to save card credentials and use them later for checkout, you need to set the customerID parameter with ID of the card owner. All the saved cards will be associated with this customer ID and the list of all the saved cards will be shown to your customer during checkout procedure. If the customer decides to delete a saved card, the SDK for iOS library will send the corresponding request to the payment platform to remove the card from the list of saved cards.
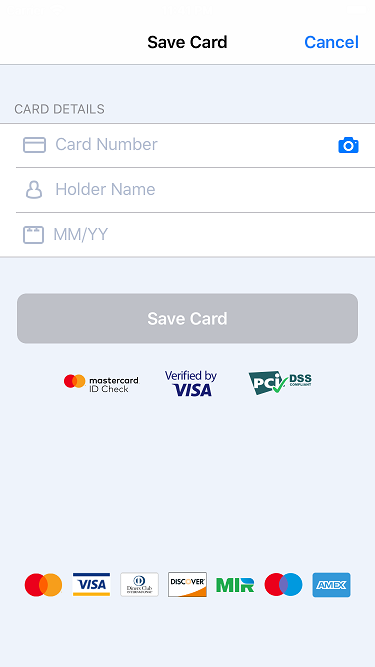
Checkout by using tokens
By using the SDK for iOS library, you can implement token-based checkout. Before using the token-based checkout functionality, you need to implement storing payment card credentials and its token on your back end. Each time you initiate a token-based checkout, you need to set the token parameter of your payment object:
paymentInfo.setToken(token);
[paymentInfo setToken:token];
Do not forget to include the parameter in your signature generation procedure. You customer will see the payment form with the preselected card with all its credentials, except for CVV, entered in the corresponding fields.
Automatic token generation
"account": {
            "number": "546942******3838",
            "token": "7e12077a71faf915bc4bda60f059854c7df4a46e7573057e52ece0801245666b",
            "type": "mastercard",
            "card_holder": "JOHN SMITH",
            "id": 7279487,
            "expiry_month": "11",
            "expiry_year": "2021"
        },
Token generation by request
Tokenize as action type:paymentInfo.setAction(action: .Tokenize)
[paymentInfo setAction:ActionTypeTokenize];
The generated token and the time it was created at are returned in the token generation response.
Checkout
One-step purchase
By default, SDK for iOS uses one-step purchases (action type Sale). This type of checkout works right out-of-the-box and requires no additional setup.
Two-step purchase
SDK for iOS supports two-step purchases in which payment is performed in two steps.
- Before opening the payment form, set the action type parameter in the payment object to
Auth:Figure 19. Swift paymentInfo.setAction(action: .Auth)
Figure 20. Objective-C [paymentInfo setAction:ActionTypeAuth];
- Capture payment by using Dashboard or sending payment capture request to the /v2/payment/card/capture endpoint.
For more information about two-step purchases, see Authorization hold.
COF purchases
PSPHost allows you to perform COF purchases. There are three types of COF purchases: OneClick, auto payments and regular payments. For more information about COF purchases, see Overview.
sale, auth and verify operations and is supported only for purchases by using payment cards.RecurrentInfo object with the following parameters:- type—type of COF purchase (
.OneClick,.Regular,or.Autopayment) - cardOperationType—type of operation in terms of which COF purchase is registered. Possible values:
sale—purchase with direct withdrawal of fundsauth—authorization hold which is a part of two-step purchaseverify—payment instrument verification
- expiryDay—last day of the payment period
- expiryMonth—last month of the payment period
- expiryYear—last year of the payment period
- period—payment period
- time—time or COF purchases
- startDate—date to initiate the first payment
- scheduledPaymentID—payment ID, must be unique within your project
let recurrentInfo = RecurrentInfo(type: .Regular,
                    cardOperationType: "sale",
                    expiryDay: "20",
                    expiryMonth: "11",
                    expiryYear: "2020",
                    period: .Month,
                    time: "12:00:00",
                    startDate: "12-08-2019",
                    scheduledPaymentID: "your_recurrent_id")
RecurrentInfo *recurrentInfo = [[RecurrentInfo alloc] initWithRecurrentType:RecurrentTypeRegular
                    cardOperationType:@"sale"
                      expiryDay:@"20"
                    expiryMonth:@"11"
                     expiryYear:@"2020"
                         period:RecurrentPeriodMonth
                           time:@"12:00:00"
                      startDate:@"12-02-2019"
             scheduledPaymentID:@"pid624455712795"];
- Amount of COF purchase. By default the amount of COF purchase is equal to payment amount. To change it, set:
Figure 23. Swift recurrentInfo.setAmount(amount: 1000)Figure 24. Objective-C [recurrentInfo setAmount:1000]; - Data and amount of COF purchase. By default the debit of funds is strictly fixed in time and amount. To customize schedule for COF purchases, set:
Figure 25. Swift recurrentInfo.setSchedule(schedule: [ RecurrentInfoSchedule(date: "10-10-2020", amount: 1200), RecurrentInfoSchedule(date: "10-11-2020", amount: 1000), ... ])Figure 26. Objective-C [recurrentInfo setSchedule:@[ [[RecurrentInfoSchedule alloc] initWithDate:@"10-10-2020" amount:1200], [[RecurrentInfoSchedule alloc] initWithDate:@"10-11-2020" amount:1000], ... ]];
RecurrentInfo object into the PaymentInfo object.paymentInfo.setRecurrent(recurrent: recurrentInfo)
[paymentInfo setRecurret:recurrentInfo];
Card verification
The card verification is used when it is necessary to check the customer's card without debiting the card, as well as to save the card data for future use. With card verification, a zero amount is debited to the card.
Verify as action type:paymentInfo.setAction(action: .Verify)
[paymentInfo setAction:ActionTypeVerify];
Purchase by using alternative payment methods
General information
Payment processing flow through SDK for iOS using alternative payment methods can be divided into two types: the first type involves confirmation of payment processing by the alternative payment method service without redirecting the customer to this service (this is relevant only for Apple Pay), and the second type involves redirecting the customer to the alternative payment method service for payment confirmation and processing (this is relevant for other alternative payment methods). Diagrams showing both of these types are provided below along with the description of special features of using the Apple Pay and the WebMoney payment methods.
To enable support for purchases by using alternative payment methods, contact the PSPHost technical support.
Apple Pay
In order to implement payment processing which involves the Apple Pay payment method, it is necessary to do the following:
- Register merchant's identifier (Merchant ID) with Apple. Merchant ID allows the merchant to accept payments involving the Apple Pay method. This ID never expires, and can be used in multiple websites and iOS applications. For more information see Apple documentation: Create a merchant identifier.
- Create Payment Processing Certificate. This certificate is associated with Merchant ID and is used to secure transaction data when processing payments that involve the Apple Pay method. For more information see Apple documentation: Create a payment processing certificate.
- Send Payment Processing Certificate to the PSPHost technical support using the agreed security methods.
- Enable the Apple Pay capability for the mobile application in the programming environment. For information about enabling Apple Pay capability in Xcode environment see Apple documentation: Enable Apple Pay
Once these steps are completed, it is possible to process payments involving the Apple Pay payment method. The main procedures, such as opening the payment form, processing response and callbacks, are performed the same way as when other alternative payment methods are used, but you also need to consider the following:
- Merchant's identifier (Merchant ID) must be specified. This can be done as follows:
Swift
paymentInfo.setApplePayMerchantID(merchantID: "merchant.example.com")Objective-C
[paymentInfo setApplePayMerchantID:@"merchant.example.com"]; - The currency of purchase can be EUR, GBP, RUB, USD.
- For the Apple Pay payment session to start correctly, it is strongly recommended to set the country code for regionCode parameter (according to ISO 3166 alpha‑2). The specified country code must correspond to the customer's location.
- If needed, additional information about payment can be added to the authorization page of the Apple Pay payment sheet by using the applePayDescription parameter. The information to be added must be specified as the value of this parameter and will be displayed in the Pay field on the Apple Pay payment sheet (this is applicable to the
sale,authandverifyoperation modes of the payment form). For the correct display of information, it is recommended to specify the value of the applePayDescription parameter briefly. The usage of the applePayDescription parameter is optional, and if it is not specified in the request, in the Pay field the value of the paymentID parameter is displayed.
Payment involving the Apple Pay payment method is processed as follows.
.svg)
- The customer initiates a purchase.
- The mobile application sends request to SDK for iOS to open the payment form.
- The request to open the payment form is sent to the payment platform.
- The payment platform performs request processing that involves validation of the required parameters and signature.
- Response to the request is sent from the payment platform to SDK for iOS.
- The payment form, configured with account taken of invocation parameters and special features of the project, is displayed to the customer.
- The customer selects the Apple Pay method.
- The request for starting payment session is sent from SDK for iOS to the Apple Pay service.
- The request for starting payment session is processed and the session data is generated on the Apple Pay side.
- Payment session data is sent from the Apple Pay service to SDK for iOS.
- Apple Pay authentication form is displayed to the customer.
- The customer completes all required steps.
- On request of SDK for iOS, authentication is performed on the customer's device.
- Request for purchase processing is sent from SDK for iOS to the payment platform.
- The request is processed on the side of the payment platform.
- The request for purchase processing is sent to the card organisation service.
- The purchase request is processed on the card organisation side.
- The payment result notification is sent from the card organisation to the payment platform.
- The callback with the payment result information is sent from the payment platform to the back end side of the mobile application.
- The payment platform sends the payment result notification to SDK for iOS.
- Information about the payment result is displayed to the customer on the payment form.
Registration of COF purchases involving the Apple Pay method is also supported. For more information about the required parameters as well as Swift and Objective-C code samples see the COF purchases section.
Other alternative payment methods
The full sequence of the purchase process involving redirection to the alternative payment method service is provided below.
.svg)
Gathering customer data
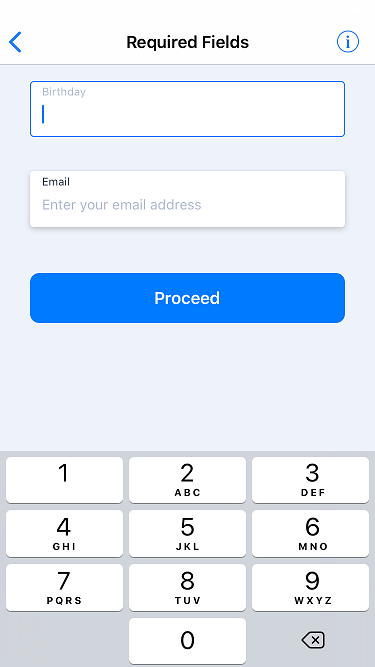
Usually payment form requires a minimum of data to complete a request for payment. However, in order to gather more extensive data and statistics about customers you can send and/or request additional data about your customers, such as customer phone number or email. For more information, see Collecting customer data.
paymentInfo object:
paymentInfo.setAdditionalFields(additionalFields: [
          AdditionalField(type: .customer_first_name, value: "Mark"),
          AdditionalField(type: .billing_country, value: "US"),
          AdditionalField.init(type: .aps_account_number, value: ""),
          AdditionalField.init(type: .aps_account_security_code, value: "")
          ....
])
[paymentInfo setAdditionalFields:@[
                 [[AdditionalField alloc] initWithType:customer_first_name value:@"Mark"],
                 [[AdditionalField alloc] initWithType:billing_country value:@"US"],
                 [[AdditionalField alloc] initWithType:aps_account_number value: ""],
                 [[AdditionalField alloc] initWithType:aps_account_security_code value: ""]
                 ...
]];
Customization
- use pre-defined themes (light and dark)
Figure 35. Light theme of the payment form
Figure 36. Dark theme of the payment form 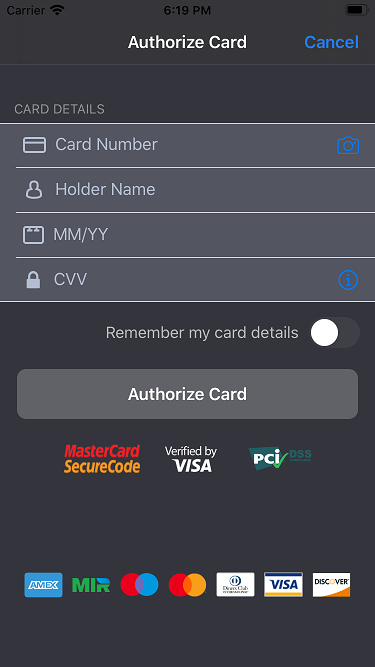
- set the custom value to any available setting
Using pre-defined themes
SDK for iOS allows you to choose between two pre-defined themes (light and dark) of payment form. By default SDK for iOS uses light theme.
let theme = PsphostTheme.getDarkTheme()
psphostSDK.setTheme(theme: theme)
PsphostTheme *theme = [PsphostTheme getDarkTheme];
[self.psphostSDK setTheme:theme];
Changing settings
theme.backgroundColor = UIColor.green
theme.showDarkKeyboard = true
theme.backgroundColor = UIColor.greenColor;
theme.showDarkKeyboard = true;
overlayColor—the color of the overlaybackgroundColor—the color of the background of the payment formheadingTextColor—the color of the headingmenuTextColor—the text color of the buttons in the heading of the modal windowfieldTextColor—the text color of additional fields, payment methods names, text on the page with information about the resultsupportiveTextColor—the color of the additional textfieldPlaceholderTextColor—the color of the placeholder textsfieldImageTintColor—the color of the icons of the CVV field and payment data fields for payment with a new cardfieldTextCorrectColor—the color of the text if validation of the completed field is successfulfieldTextWrongColor—the color of the text if validation of the completed field failsfieldBackgroundColor—the color of the buttons of payment systems and CVV fieldprimaryTintColor—the main color of buttons and icons of the payment form,secondaryTintColor—the secondary color of the payment form,lineColor—the color of the field borders on the page with fields for payment with a new cardactionButtonDisableBackgroundColor—the color of the disabled action buttonactionButtonDisableTextColor— the color of the text on the disabled action buttonactionButtonTextColor—the color of the text on the action buttonshowShadow—enables shadow for payment methods and saved cards on the page of payment method selectionshowDarkKeyboard—enables dark theme for the keyboardshowDarkNavigationBar—enables dark theme for the navigation barshowLightLogo—enables light logos when using dark theme